
Search This Supplers Products:Road safety productstraffic signsolar traffic signsolar road studssolar signs
The Manufacturing Process of road signs
The Manufacturing Process of road signs
The production of signs can involve many different processes, depending on whether the
Road Sign retroreflective sheeting uses a heat-sensitive or pressure-sensitive adhesive and whether silk-screening, etching, or other coloring processes are used. Many traffic signs, however, undergo the following process using heat-sensitive adhesives.
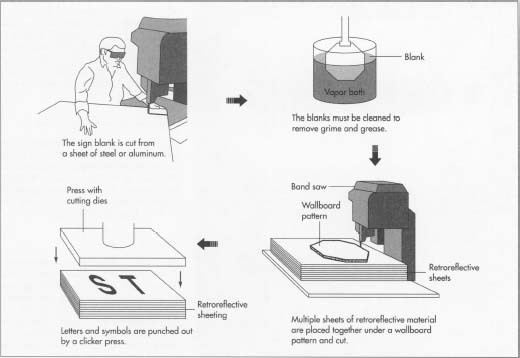
Cutting the blank
1 The sign blank is cut, usually from a sheet of steel or aluminum, by a metal shear machine or a band saw. Corners are rounded using the rounding-selection mode on a punch machine. Holes for mounting the sign are punched or drilled.
Checking the blanks
2 The blanks are checked for any defects or contamination. Blanks must be free of grime in order for background sheeting to adhere properly. The "Tape Snap" test checks for the presence of dirt. A piece of transparent cellophane tape is applied to the dry blank surface and "snapped" up at a right angle. The presence of color or particles on the tape indicates contamination. Any trace of oil or wax is tested by the "Water Break" exercise. Water poured over the blank surface should flow evenly and completely; beading action denotes contamination.
Degreasing the blanks
3 The blank surface is wiped with mineral spirits or naphtha to remove greasy fingerprints. The surface is dried with a clean, lint-free cloth before the solution evaporates. The blank is then degreased by immersion in a bath of trichloroethylene or percholorethylene vapor. Certain alkaline solutions can be used instead of the vapors in the bath. A water rinse afterward is not necessary
Cutting the retroreflective sheets
4 Using scissors, razor blades, a knife, or a paper cutter, individual background retroreflective sheets are cut by hand. Multiple sheets, on the other hand, are cut using a band saw. In this process, the shape of the sign is traced on to a 0.125-inch (3.2 mm) wallboard. This wallboard is laid on top of about 50 sheets, secured and nailed to a hardboard cutting base. The band saw follows the pattern and cuts the sheets.
5 Letters and symbols are punched out from white or black retroreflective sheeting either by hand or by using a "clicker" press. Up to 29 sheets can be placed in the press at once; cutting dies, which function much like cookie-dough cutters, are placed in the machine to produce the desired characters.
Applying sheet to sign blank
6 The adhesive liner on the back of the background sheeting is removed in one motion, and the sheeting is applied to the dry blank surface. The sign is cranked through a large squeeze-roller applicator to remove air bubbles trapped between the sheeting and the blank. Edges are then trimmed.
Heating the sign
7 The sign is placed in a heat lamp vacuum applicator for one minute, removed, and allowed to cool before the sign copy and border are placed on the sign. The squeezeroller applicator or a hand roller is used over the copy to eliminate air bubbles. The sign is then covered with a plastic slipsheet and placed in the heat lamp vacuum applicator for another minute.